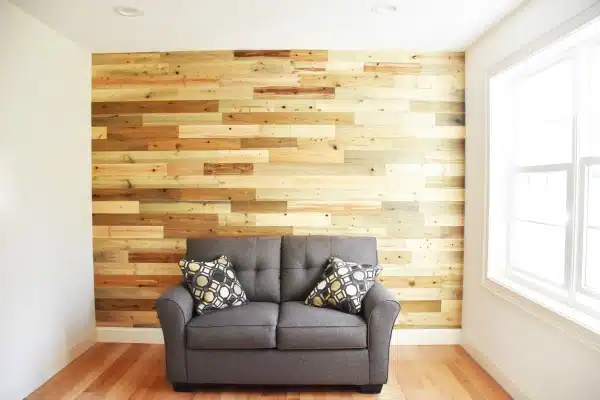
Looking for an easy way to add a rustic shiplap style accent wall to your home? We used Timberchic peel and stick wood planks and the results speak for themselves. Read on to see how you can easily get the same results in your home! Thank you Timberchic for sponsoring this post!
Why Make an Accent Wall?
We had just moved into our new home. Being a new construction that we purchased after it was already finished, every single wall was painted white! It’s great to be given a clean slate to start off with, but boy do we have a lot of walls to paint!
I’ll let you in on a little secret about me… I HATE PAINTING! I hate it so much that I recently purchased an 18 inch roller, just so I could paint the walls twice as fast!
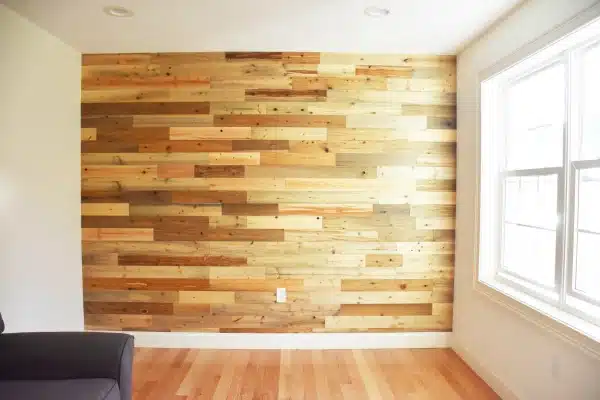
Because of my feelings toward painting, I’m always open to alternative ways to accent a wall besides a different color paint. A Shiplapped wood plank wall adds the perfect warm and rustic feeling to any room, so we decided it was the best choice for our living room.
About Timberchic Peel and Stick Wood Planks
Timberchic proved to be the perfect solution. Their product is made from reclaimed wood from a riverway that was used to boat wood used in Maine’s lumber and paper mills for over 150 years.
Timberchic reclaims 1000 acres worth of forestry from this water system on a yearly basis. They’re helping to return the river to it’s natural ecosystem while also providing us with this awesome unique product.
Timberchic wood is 1/8 inch thick, so it can be used to cover a multitude of different surfaces. It’s versitality is endless, so let your imagination take hold when thinking of how to use this beautiful natural resource.
I used it to accent a wall in an alcove in my home. I wanted it to be a focal area where I’d eventually like to add a pellet burning wood stove. The natural character and random assortment of Timberchic River Planks made it the perfect choice.
How Timberchic Works
The way Timberchic works is simple. There are 3 strips of double sided tape adhered to each board. You basically peel off the tape’s protective paper and stick it to the surface. It’s really that easy, but I’ll give a bit more detail of the steps involved below.
How to Install Timberchic Boards to a Surface
Step 1 – Layout:
Layout your surface so you don’t end up with less-than a half-wide board at either the top or bottom row. The way you do this is by measuring the height of the surface and divide that by the width of the Timberchic boards you ordered.
Example: My boards were 4″ and my wall was 86″ high, so I was going to end up with 21 and 1/2 rows. This meant that 1 row was going to be half the width of the boards, which is 2 inches. (I chose to make the bottom row the 2 inch row, because it’s less noticeable than the top.)

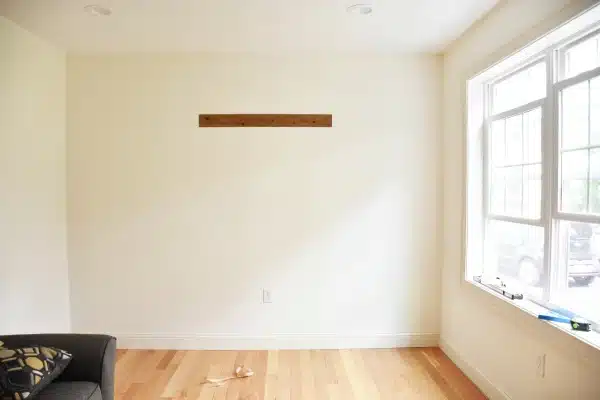
Step 2 – Start the First Row
Start the first row at a comfortable height down from the ceiling so it’s easy to reach.
Snap a chaulk line at that height and start your first row.
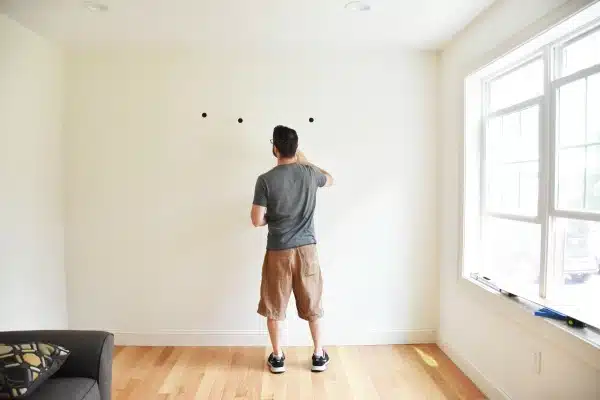
Tip: Start at one side (left or right) of the wall/surface first, not in the middle. I started in the middle and then needed to cut boards to fit on each side that met the inside corners of the room. If I had started on 1 side or the other, I would have only needed to cut 1 board to fit.
Peel off the protective paper from the double sided tape.
Carefully press it to the wall surface.
Use a J-Roller to adhere it firmly to the surface. If you don’t have a J-Roller, you can use your hands to press and smooth it on the wall (a roller works better though).
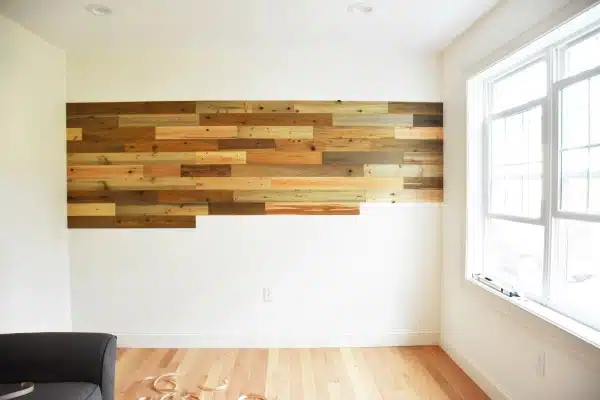
Step 3 – Peel, Stick, Cut, and Repeat!
Repeat this process for all the boards.
Any board that doesn’t fit, needs to be cut to size.
Place boards by random lengths and color shades.
Overlap ends of boards by at least 3 inches for a uniform look.
How to Cut Timberchic Boards
- Mark it with a pencil.
- Using a speed square, score both sides of the board with a sharp utility knife.
- Place the scored line along the edge of a sturdy surface like a table or counter, and snap it at the line.
Timberchic has different shades of reclaimed wood to choose from if you don’t want it as random as I did. Check out their website for the choices.
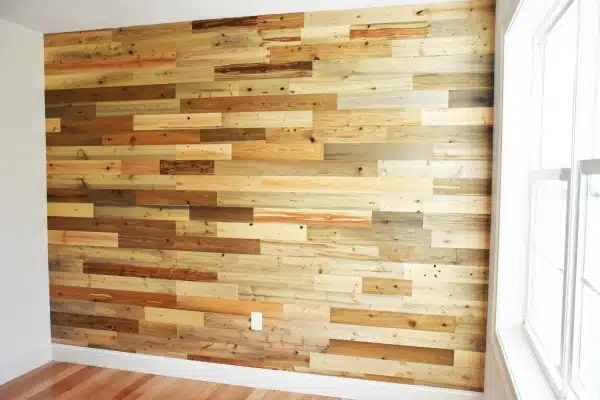
Timberchic accented my wall better than any paint color could have. I’m very happy with the way it came out.
I chose to accent my wall with Timberchic, but the uses are endless.
Watch the Installation Process in the Video Below:
Check out our Timberchic YouTube video!
Oh my God! That is gorgeous! It’s so rustic and contemporary, I love it! Looks like something I could even try doing in my bedroom!
I would have never thought of using repurposed wood for an accent wall. I totally love it! It gives your space a nice modern-rustic (if that even makes sense) feel.
That is so beautiful! I’ve never thought of doing a wood accent wall before. That’s such a gorgeous look!
Wow, all you need to do is stick it? That is the greatest thing I heard, talk about making it easy, The wall looks fantastic.
Oh my gosh that is gorgeous! I want to do that so bad! It would bring so much classy look to our house!
Oh my goodness I love this wall so much. I really want to do this in my boys room but I’m intimidated by it. You make it look do-able. It’s lovely!
It sounds like it’s easy to apply these Timberchic boards! I can definitely think of a couple of projects I’d like to use them for!
This is such a pretty accent wall. I love the idea of a wooden accent wall.
I love the idea of a reclaimed wood accent wall. It really makes a bold statement in the room.
I really want to do a plank wall in my new house and that is DEFINITELY the easiest way to do it! Pinning this so I remember it.
I love the look of your accent wall. I agree with your choice of using random pieces. It’s really eye-catching.
I am loving this wall!!! The random pieces really adds a much more rustic look which I think adds so much more character!!
I;m loving this wood. This is such a great idea and i’m loving the look!
Such a beautiful look! I would love to put a reclaimed wood wall in our playroom… mostly because I also want to lower the ceiling and build out over it and think it would add such a perfect punch of interest to the room!
I’m so jealous – WANT!! I love this style and the idea of making our own accent wall in our chosen color. You did a great job!
Very cool and creative. I love the ideas
That is so beautiful!! I don’t know if I would have enough patience to do it.
This is amazing!! I really love how it turned out! Gorgeous!
I love this idea for an accent wall. What a gorgeous look.
I would have never thought of doing this! I love it! It looks very classy. One thing I know though, patience is a virtue.
just curious if you have any trouble with the boards not staying stuck to the walls after so many months or is this a good permanant wall idea
Hi, I emailed you with an image update. These boards are super, duper sticky and I personally do not feel they will ever come off. Of course, everyone’s experiences could vary. Please reach out to the brand to see what their lifestime may be. Thank you!
That looks great! how many boxes did you need to order to complete the job?
Hi, I cannot remember right now since this was years ago! They are very helpful though and can let you know how many you would need if you provide the dimensions.